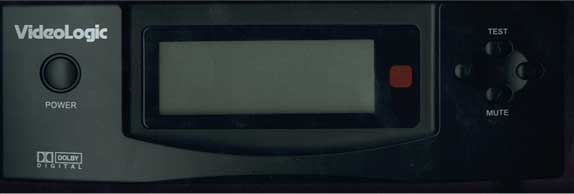
The DigiTheatre Decoder
The decoder box, which is also known as the Digitheatre
decoder, is the most attractive part of the kit. The dimensions of the unit
are 180(w) x 132(h) x 60(d) mm which is by far smaller than what we would
imagine by looking at its picture. Not only is it the most attractive, part
but yet most expensive part of the whole kit. VideoLogic sells stand alone
DigiTheatre decoders at a street price of £127.65 or 190$ USD which by far
more than what we could imagine by looking at it.
The price speaks for its self when a closer
look is taken at its specifications. The Digitheatre uses the Zoran ZR38600
DSP chip; one of the best known AC-3/ProLogic/Surround decoders on the market
as its mostly used in the most expensive Home Theater Equipment.
The front panel of the unit features five buttons
and a full sized LCD panel. On the left a power button is present which of
course turns the Decoder on and off. Completely on the right side there are
four buttons formed in a circled shape. First is the Test button; it runs
a sound test routine, more on that later in the installation chapter. The
Test button doubles as the down button when used in the LCD menu. The next
button is the Mute; it cuts the sound off, the M button; the M stands for
MODE, is used to select the appropriate menu on the LCD. To finish is the
enter button, its a simple button used to select. The LCD panel handles all
the configurations and displays the audio modes being used. The next paragraph
will explain some of its possibilities.
|
|
|
Front
view of the Decoder
|
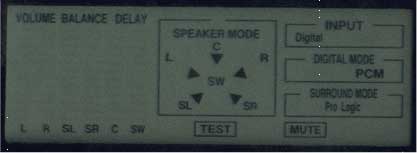
The DigiTheatre
features three different little different mode tables displaying the type
of audio being encoded: here they are, sorted by upper order. The input indicates
whether the decoder is decoding analog or digital. If a digital connection
is used the decoder will automatically detect it. If you use analog, simply
press the input button on the remote to switch modes. The next window on the
LCD is Digital Mode; it displays the type of the digital signal being used
(AC-3 or stereo (PCM). Next is the surround mode; it displays the kind of
surround effect being used. If the input is digital the Pro Logic Auto ON
feature will detect it as AC-3.
Next are the different configurations and features
that are controllable via LCD or simply visible on the LCD panel. First is
the Mute, it appears at the very bottom and flashes when its activated. Second
is the test feature, it also appears at the very bottom of the LCD and flashes
when the test is on. Next is the Speaker Mode, which lets you, configure different
audio modes. It can send audio channels to different speakers. For example,
if you use two speakers you can mix the surround and center channels to them
and hear the full soundtrack without missing any effects that are being reproduced
in the other channels. The decoder always displays the speaker mode via a
graphical scheme. Following is the Volume: a graphical interface will appear
and will let you control the volume across all the channels via remote or
from the decoder panel. Next not last is the Balance setting: you can set
a balance to each speaker. That one also features a graphical interface similar
to the volume. Last is the Delay feature: its used when setting a delay for
center or surround speakers, here too a graphical interface will appear.