|
How To Build A Thermal Probe
One of the coolest attributes
of the newer motherboards is the ability to measure temperature. Abit, ASUS,
and even lesser known brand names jumped on the full hardware monitoring
bandwagon some time ago. With such wonderful freeware programs including
Alex van Kaam's MotherBoard
Monitor, the user is presented with a multitude of monitoring information.
Voltages, CPU and case temperatures can be read in real time or tracked
over time to assist in locating hotspots that put a damper on precious performance
adjustments. A few motherboards (MB's) have an extra goody just crying out
to be used. An additional two-pin temperature sensor header can give flexibility
when trying to assess why that pesky overclocked video card keeps crashing
or which of three 10,000 rpm hard drives needs a fan pointed at it's internals.
What Is It?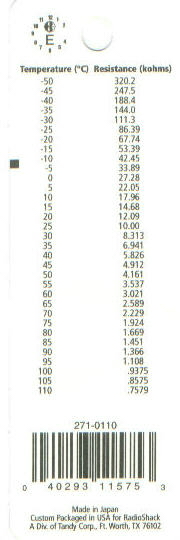
A thermal probe isn't magic, rather it's just
a semiconductor with a specific function. A semiconductor "conducts" a certain
way in one situation and another way in a different situation. Something
like a resistor is not considered a semiconductor because it's supposed
to act the same way in every situation. A thermistor by industrial trade
name, the thermal probe is simply an element of material that changes its
resistance when the surrounding temperature varies. In this case, the measured
resistance (R) has an inverse proportion to temperature (T). As T rises,
R drops and vice-versa. Take a closer look at the thermistor I purchased
from Radio Shack. Reading the table, at 25 C the probe's measured resistance
is 10KOhms (10,000 Ohms). Hence the name 10K thermistor. Just locate part
number 271-110A. They're cheap, about $1.99 plus tax.
What Else Do I Need?
Some guts. No, not cat guts your
own guts. If you lack the appropriate "guts", think twice before attempting
to construct a thermal probe. Here's a parts list. I'm sure I'll forget
some itty bitty thing because when you've been soldering and tinkering since
1969, you always end up assuming that everyone has everything, which as
I'm reminded of with your regular emails, is not true.
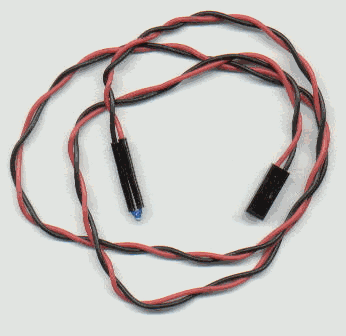
Before And After
|
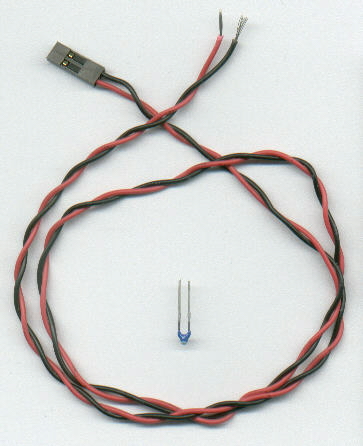
Parts
|
The
Unit
|
- 10K Thermistor (RS #271-110A)
- Two-pin computer header plug
- Pencil type soldering iron
- Solder
- Magic Fingers (holding device)
- 24 Inches of 24 gauge wire (twin lead)
- Two 1/2" strips of shrink-wrap
- 1600 Watt or better hair dryer (or
a heat gun)
- Misc. cutting & stripping tools
- Caffeine, usually Coke or Tea in my
case
- Patience, Lots of Patience
|
|
I dug through my junk box and lo
and behold, I found some old twin lead wire with the right two-pin connector
on one end and a speaker on the other end. The speaker went bye-bye. Feel
free to use longer lead wire, just remember that the accuracy of your creation
depends on the total resistance. This resistance includes any that the lead
wire has. In other words, don't solder the thermistor to 50 feet of wire.
You could measure the temperature of another floor in your dwelling, but what's
the point? Use your magic fingers to hold the lead wire and short thermistor
lead very close together.
Before soldering the wires together, place the ½" piece of shrink wrap onto
the lead wire and push it at least 6" back to avoid the dreaded condition
of "pre-shrinkage." I can't tell you how many times I've forgotten to do
this and many words, like "arrgh" emanate from my basement shop when having
to re-do perfectly good work. After the probe is attached and your shrink
job has adequately covered any exposed wire, you're ready to test out the
probe. This may very well be the most difficult part, as you must know quite
a bit about your MB. For the Abit BM6, which uses the Winbond 83782D, choose
Winbond 1 for the header located almost at the bottom left of the
board. Winbond 2 is used for the CPU and Winbond 3 is used for the ambient
case temperature. If you have any questions, consult Alex's Board Info
section. Many MB's are listed there.
Uses
Video cards still run ridiculously
hot these days, considering we are in the 0.18 micron manufacturing age.
My Viper V770 Ultra (TNT2 Ultra) overclocks nicely with the factory heatsink
fan, but one day, I accidentally stuck my finger on the chip's underside
and almost got burned. The TNT2 core, where the heatsink/fan is, only runs
at 90-95 F. The underside of the core, which faces skyward, can be measured
with the probe. Taping the little guy flat to the empty square-ish hot spot,
yielded about 110 F at idle and a whopping 122 F when playing 3D games.
At a core speed of 170 MHz and Memory speed of 195 MHz, this is simply too
hot. A possible subject for a future article is how to affix a TennMax
Lasagna cooler to the TNT2 and squeeze out a few more FPS.
Final Remarks
I'm confident that the probe
can help you trace out many hot spots in your computer. Hard drives, CD-R's,
MB chipsets, and that pesky Athlon that runs soooo hot are prime examples.
Just remember, the closer you put the thermistor to the hot spot, the more
accurate your reading(s) will be.
William
Yaple
02/29/00
|
|